Reverse Engineering the 433MHz CAME remote protocol

After reverse engineering the more complicate Cixi Yidong protocol, the CAME remote was an easy task, especially that CAME remote protocol is pretty simple.
Here is the older remote I had around, which used to open the door of a garage:

CAME remote

CAME remote

CAME remote inside

CAME remote inside

The protocol analysis:

CAME protocol analysis

CAME protocol analysis

With the help of the analysis, I could create a new protocol definition in my fork of the rc-switch library, which was then used in my OpenMQTTGateway based RF gateway.

The RF gateway is connected to Node-RED through an Eclipse Mosquitto MQTT broker.
I have also prepared Node-RED UI element and the code behind to be able to teach the devices (remote or switches) for new codes.

NODE-RED UI for 433MHz teaching

NODE-RED UI for 433MHz teaching

Reverse Engineering the 433MHz Cixi Yidong Electronics protocol

The 40 bits Cixi Yidong Electronics protocol is used by remote control switches sold here in Finland, and perhaps in many other countries under different brands (AXXEL, Telco, EVOLOGY, CONECTO, mumbi, Manax etc.).
A main reason I wanted to learn the protocol of this switches, to control them using ESP8266 based board with an RF transmitter, running MQTT gateway software OpenMQTTGateway and my Node-red based home automation solution.
The advantage of these switches, compared to WiFi controlled remote switches, that they are available with IP44 housing, which makes it good to use outdoor (e.g. to heat the car), the other reason to use them, that I had few of those at home already.

Unfortunately the rc-switch library, used by the OpenMQTTGateway, did not include the support for the protocol of the Cixi Yidong Electronics switches, so i needed to reverse engineer it and code it. I turned on my oscilloscope, and started to study the captured data. I also forked the rc-switch library, and extended with the support of the protocol.
Here is the result:

The Cixi Yidong Electronics protocol is a bit “tricky”:

  • It sends special sync pattern.
  • the 40 bits message has the 16+16+8 bits pattern
    where the first 16 bits is the remote ID, the next 16 is the inverse of the first 16 bits, the last 8 bits is the button and command (ON/OFF) ID.
  • Seems so that button/command odd numbers means ON,
    the inverse of that is OFF for the same button (enough to learn by the switch only the ON or OFF)
  • The value 0b10100101/0xA5/165 means all ON, value 0b01011010/0X5A/90 means all OFF, assigned to the same remote ID.

MikroTik site-to-site IPsec VPN connection to Azure Resource Manager based gateway

This is a short tutorial how to configure your MikroTik router to connect to Azure network with site-to-site VPN.

The things you need to do:

  1. Prepare your Azure virtual net, gateway and link configuration by following the article you can find here. There is nothing very tricky here, you just need to be careful with the following difference:
    When you run the New-AzureRmVirtualNetworkGateway, be sure that you use the VPN type: PolicyBased.
  2. Configure your MikroTik router. For this, you can search the Internet and study my screenshots.

I’m not sure if this configuration is the best, but this seems to be working.
The Firewall configuration:
Here you need to be able to exclude traffic from masquerading, fasttrack and let in the traffic from Azure virtual subnets. These screenshots show here a completely open firewall configuration between local subnets (192.168.0.0/16) and Azure subnets (10.0.0.0/16), but probably this is what you want first.

Mangle configuration to mark IPsec traffic.

Mangle table configuration to mark IPsec traffic.

Filter table configuration for let in traffic from Azure and exclude IPsec from fasttrack.

Filter table configuration for let in traffic from Azure and exclude IPsec from fasttrack.

NAT table configuration to exclude traffic from masquerading.

NAT table configuration to exclude traffic from masquerading.

IPsec configuration:

IPsec policy General tab.

IPsec policy General tab.

IPsec policy Action tab.

IPsec policy Action tab.

Enter here your pre shared key to the Secret field.

IPsec peer configuration.

IPsec peer configuration.

IPsec proposal configuration.

IPsec proposal configuration.

Please leave your comment if you have ideas to improve the configuration.

Skype for Business Exam 70-334

So I’m over my first attempt to pass the very new Core Solutions of Microsoft Skype for Business 2015 (beta). Of course no results yet, sine it is only a beta exam currently.
Also it was my first time to use the online proctored exam option from Pearson VUE. I can say that it is much easier than visiting a test center, I saved lots of time on travelling, searching for the venue, etc. However, my first attempt was not today, but yesterday, when the latest version of Pearson VUE client just didn’t work well. It started with a message, that I don’t have the right version of the client. I had to uninstall the old client, which I installed a month ago, and install the new version. Installing the new version over the old wasn’t possible, I got a meaningless message about certificate problem. After I managed to install (first uninstall old!) and start the new client, it showed only a black box when app wanted to take a headshot photo of me. I was trying it multiple times, but I was trying too long, so after I restarted the system, as it was requested by the support person through the chat, I ran out of the 30 minutes window (after the scheduled start time) when you can start the test. I had to contact again support and report the whole story again to an other support person. Rescheduling of the test wasn’t available anymore, only option was to open a new case and to wait 2-3 business days for the answer. Of course the 2-3 days was not OK this time, since the beta exam would have been expired by that time passed. So I complained about it and I got the answer in around 10 hours about a rescheduled date. Then I was able to reschedule the test for the next day.
So, if you take the online version of the test,  give enough time for yourself to test again your system. Once you are connected you still need to scan your room with your webcam, show the pockets, etc., which will also take some extra time. Clean your desk from everything, leave your mouse, keyboards, screen!

Now about the Skype for Business Exam 70-334:

  • Time is sufficient, and I hope it stays like that for the non beta version too, in the case I need to go and check the too. 🙂
  • Similarly to previous Lync exams, there are individual questions and also case studies.
  • Some ares where I believe I would need a bit more preparation:
    • Group chat migration, configuration.
    • Requirement for 10000 users meeting. Office 365 integration. Federation Route.
    • Meeting configuration, policy.
    • Number of required servers.
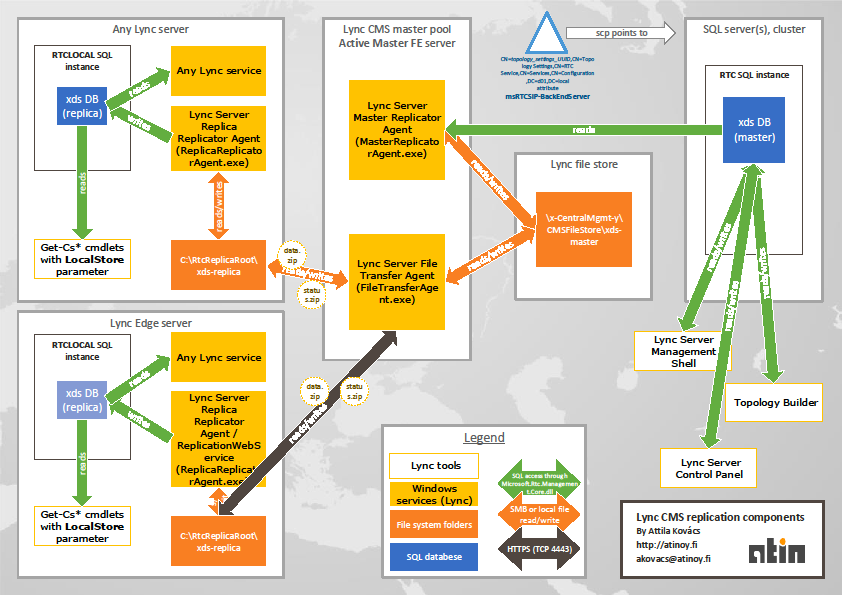
    • Central management store migration, restoration.
    • AlwaysOn Availability Groups.

My advice to prepare from:

Lync CMS technical diagram

If you ever had problem understanding and just remembering how Lync Central Management Store (CMS) replication works and how certain Lync components interact with the master or local copy of the CMS database, here you can find a simple technical diagram to show the links between the processes and components on a single picture. You might need still to study the process, but the diagram should give you a big help understanding it.

Lync CMS replication (PDF)

Lync CMS replication

Using DFS for Lync file share

Lync file share permissions gets configured by the Lync topology builder when you publish the topology and the Lync file share has the change permissions for the user (you) running the Topology Builder. This doesn’t really work and gets a little bit more trickier, when you want to user DFS for Lync file share, but it very simple if you follow the procedure I’ve figured out. Let’s see how it works.

Continue reading

Cannot find any global catalogs in forest

It’s been a while since my last post, but my excuse can be that I only publish things which I find really interesting. Also, I had been quite busy recently. I know, who wasn’t?

OK, what I quickly want to share with you a quick fix for the following issue:
When you try to do schema preparation during your Lync deployment, you face the error message:

Install-CSAdServerSchema : Command execution failed: Cannot find any global catalogs in forest "d01.local".

You are sure, that you have the GC available in your forest. So what is going on here?
The answer might be for this question, that you don’t have a GC in the site (AD site) of your wannabe Lync server or from where you ran Install-CSAdServerSchema!

You can easily verify it by checking the sites and subnets in the Active Directory Sites and Services console.

To make it clear what happens in the background before you get the error message, here is a screenshot from Wireshark, showing the DNS query to find the GC in the site:

dns_site_srv

Lync – Skype federation seems to be working

After upgrading to the latest Windows 7 Skype version (6.3.0.105) and having Lync Server 2013 with CU1 at the company, I managed to send IM and call my Skype endpoint using my Lync 2013 client.

The trick was to sign in Skype using my old Windows Live account. That account I’ve previously added to my existing Skype account.

These functions seem to work:

  • Peer to peer IM.
  • Peer to pee audio.

Doesn’t work (yet?):

  • Contact information in Skype about the Lync user and vice versa. Except the Messenger mood message (not the Skype!) is visible in Lync. Actually I don’t know how to change that mood message.
  • Peer to peer video, and sharing sessions in any direction,
  • Adding Skype user to Lync meeting.
  • Transferring Skype caller to other Lync user, or phone number or parking the call.
  • Using Skype on Android will show unknown caller and produce strange call history records.

Some screenshot

Skype conversation window while having a Skype - Lync call.

Skype conversation window while having a Skype – Lync call.

Skype - Lync call on Android phone

Skype – Lync call on Android phone

Skype - Lync call on Android phone

Skype – Lync call on Android phone


Lync 2013 Centralized Logging Service (CLS) Scenarios

Since Centralized Logging is completely new concept in  Lync 2013, the available material on MSFT websites and all around the Internet is not very extensive.

This is how it works

  • The ClsAgent runs on each Lync 2013 servers and waits for command to start, stop and search the traces according to a scenario. Also it delivers the results to the CLS controller. See this article.
  • Scenarios define which Lync components (providers) at which Level and Flags will capture traces.
  • There are default scenarios and custom scenarios. See this article for more details about the default scenarios.
  • Custom scenarios can be created with the command New-CsClsScenario.
  • To create a scenario, provider configurations have to be created and added to the scenario: New-CsClsProvider
  • To create a provider configuration you need to know what components are available for tracing. To get the list of them you need to see the file “c:\Program Files\Common Files\Microsoft Lync Server 2013\Tracing\default.xml
    Here is a little PowerShell script to list those providers:

    [xml]$providers = Get-Content "$env:ProgramFiles\Common Files\Microsoft Lync Server 2013\Tracing\default.xml"
    $providers.ComponentInfo.Components.Component
  • Save the script as get-LyncLogProviders.ps1 and run it to list the component names:
    .\get-LyncLogProviders.ps1 | Select-Object name
  • If you want to see the available trace levels and flags for a certain provider/component (here Autodiscover) :
    .\get-LyncLogProviders.ps1 | Where-Object {$_.Name -eq "Autodiscover"} | Select-Object -ExpandProperty Levels | Select-Object -ExpandProperty Level
    .\get-LyncLogProviders.ps1 | Where-Object {$_.Name -eq "Autodiscover"} | Select-Object -ExpandProperty Flags | Select-Object -ExpandProperty Flag
  • Now you know the provider name and what levels you can or should set up for the new CLS trace provider. Now you can create a new trace provider configuration and a new scenario.:
    $provider = New-CsClsProvider -Name "AutoDiscover" -Type "WPP" -Level "Verbose" -Flags "TF_COMPONENT"
    New-CsClsScenario -Identity "global/AutoDiscover_by_Attila" -Provider $provider
  • It’s time to start tracing with the new scenario. You can sync the traces to write the captured trace to the files on the servers, you can also stop the trace if you don’t need it anymore. You can start tracing on a specific server or pool, see the Technet article.
    Start-CsClsLogging -Scenario "AutoDiscover_by_Attila"
    Sync-CsClsLogging
    Stop-CsClsLogging -Scenario "AutoDiscover_by_Attila"
  •  Now you probably have what you wanted to capture, but you need to collect those from the Lync servers and save it to a file. If you only want to see the trace of a component, you have to specify it in your search query. E.g.
    Search-CsClsLogging -Components "AutoDiscover" -OutputFilePath "C:\temp\logfile.log"

I’m not sure if the mentioned .xml file is the proper source of available providers/components. If you have better idea, please share it with me.

Polycom RMX IVR slides sizing

If you’ve ever had problem uploading your slides to your Polycom RMX video bridge, here is my little guide.

  1. Use a standalone RMX Manager, not the one running in the browser.
  2. Create a low resolution image in the size 704*576 pixels and save it as 24 BitsPerPixel BMP, the file size should be 1 216 566 Bytes.
  3. Create the high resolution version of the same slide in the size 1920*1088 pixels and save it as 24 BitsPerPixe JPG, the file size shouldn’t exceed the 300 KB.
  4. So the two files have the same name, but different extension!
  5. Upload first the small resolution file and then the high resolution file.
  6. When you try to upload and you don’t see the blue progress bar, you need to try from an other computer, I don’t know the reason why the upload doesn’t work from some computers. Any idea?

So there are some issues, but using this procedures, I managed to upload the slides.

Unfortunately there seems to be a bug in the RMX. When it send 720p30 resolution stream to an endpoint, the low resolution slide is used. The HD slide is used only if 1080p30 stream is sent to the video endpoint.